How to Teach the Demo
A walkthrough for running a first game with new players.
Battlefield Setup
Set up a 2ft × 3ft battlefield with terrain before players arrive. Deploy the two crews in opposite corners — those are the Setup Areas. Place 5 Objective Tokens in a line across the width of the board:
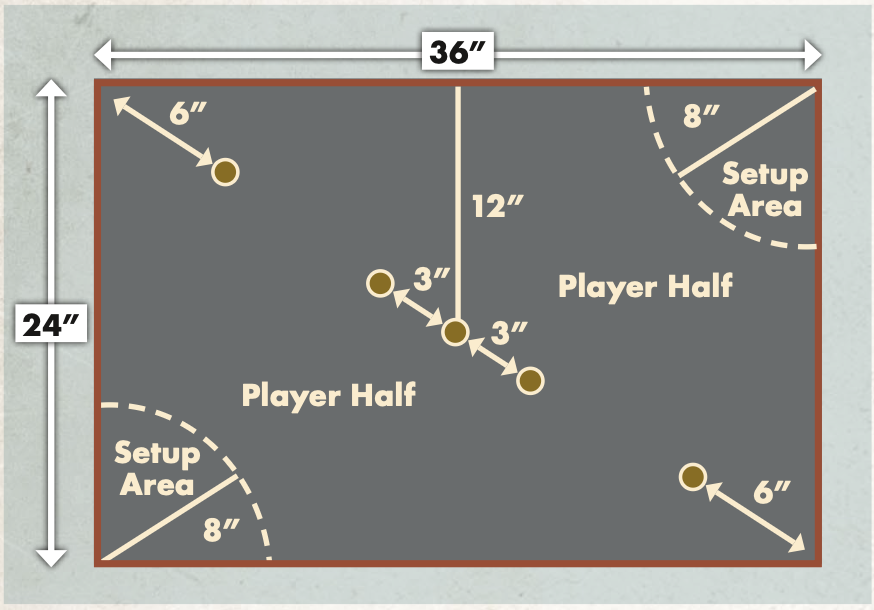
- 1 token at the center
- 2 tokens within 3" of center, towards the two empty corners (the ones without crews)
- 2 tokens within 6" of those same empty corners, lined up with the other three
Roll off to determine who takes which corner and who holds the Initiative Token first.
Before You Start
Place 4 Round Tracker tokens face-up beside the board. Make sure each model has its crew card nearby.
Tell players: "This is a skirmish game — you're each running a small crew. The game lasts 4 rounds."
Explain scoring: "There are 5 objective tokens across the middle of the board. From the end of Round 2, we check who controls each one — a token is yours if you have more models within 3" of it than your opponent. Controlling any token scores you 5 points. Controlling more tokens than your opponent scores an extra 5 points. Highest score after Round 4 wins."
Step 1 — The Models
Point to one of your models: "Every model has a SPECIAL profile — seven stats from 1 to 10, all on the crew sheet. The higher the number, the better. The important ones today are Endurance — that's their toughness — and Luck, which powers your lucky dice. The circles next to H show how many wounds this model can take before going down — we'll come back to these when we cover damage."
Don't explain all seven stats now. Let them come up naturally.
Step 2 — Round Structure
"A round works like this: whoever holds the Initiative Token activates one of their models first, then the other player activates one, and you keep alternating until everyone has gone. Then the round ends — flip a Round Tracker token and start again."
Point to the token: "The first player to stop activating — to Pass — grabs this token and goes first next round. So there's a tension: activate more models, or give up going-first advantage?"
Step 3 — Activating a Model and Actions
Pick up a model and put it back down. "When you activate a model, you take one or more Actions with it. Every Action costs 1 Fatigue — place a token next to the model. Once it has 2 Fatigue it's Exhausted and can't be activated again this round. At end of round, all Fatigue clears."
Walk through the actions by pointing at models on the table:
- Get Moving — "Move up to 8 inches for 1 Fatigue, or 12 inches by taking an extra Fatigue (Hurrying). Only available when not in base contact with an enemy."
- Open Fire — "Make a ranged attack. Only available when not in base contact with an enemy."
- Patch Up — "Recover 2 Harm from yourself. Only available when not in base contact with an enemy."
- Brawl — "Melee attack. Only available when in base contact with an enemy — that's called being Engaged."
- Back Off — "Move up to 3 inches to leave an Engagement. You can't just walk away — you have to use this Action."
"A model can't take the same Action twice in a Turn — except a weapon with the Fast trait lets you make two attack Actions with it in the same Turn."
Step 4 — Movement and Terrain
Pick up a model and physically move it around a terrain piece. "Movement isn't measured in a straight line — the model navigates around obstacles, and you measure the actual path it takes. As long as the total distance is within 8 inches, you're fine."
Small obstacles: "Anything under 1 inch tall — low rubble, a doorstep, a slight rise — doesn't count toward movement distance at all. The model just crosses it for free."
Climbing: "To climb up or down a level, the model needs a feature to use — a ladder, a rope, stacked crates, the side of a vehicle. The vertical distance climbed counts against the move — so a model climbing 3 inches up has 5 inches of horizontal movement left from an 8-inch move."
Engagement and Proximity: "Each unengaged model has a 1-inch bubble around its base — that's its Proximity. An enemy can't enter that bubble unless they're moving all the way into base contact to Engage. Once a model is Engaged, it loses its Proximity and others can move past it freely."
Step 5 — Making a Ranged Attack
Pick a model with a ranged weapon and find a target. Walk through this live:
Line of Sight: "Trace a line from any part of your model to any part of the target. If you can reach it without passing through another model or terrain, it's Visible. If you can reach all parts of the target — no part is hidden — they're Wide Open and you get a bonus die."
Range: "The weapon range is listed on the card — for example 'Rifle (24")'. Measure from the closest edge of the attacker's base to the closest edge of the target's base. If within range, normal attack. If outside, the attack is Unlucky — no Luck dice, no Bonus Dice, basically a long shot."
The roll: "Look at the weapon's test — something like '4P'. The number is your pool size, the letter is the stat you're rolling against. Pick up 4 dice. You can swap up to L of them — that's the model's Luck stat — for Luck dice (use a different colour). Roll everything."
"Any die equal to or under the stat is a Hit. Everything else is a Dud — remove it. Then: each Luck die still in the pool triggers Fortune Smiles — roll one extra die for each. Count all Hits. If any Luck die survived, the weapon's Critical Effect triggers too."
"You also get +1 Bonus Die per Harm the target already has — injured models are easier to finish off."
Step 6 — Melee
Move a model into base contact. "This model is now Engaged. It can Brawl or Back Off — that's it. Same dice process as ranged. Melee Bonus Dice: +1 if you moved into Engagement this Turn (you charged), +1 per Harm on the target, +1 for each other friendly also Engaged with the same enemy."
Step 7 — Damage
After rolling, count the Hits and compare to the target's Endurance (E) on the crew card:
| Hits | Result |
|---|---|
| Less than E | 1 Harm — fill one circle |
| Equal to E or more | 1 Injury + 1 Harm |
| Double E or more | Incapacitated — model is out |
"Harm tokens stack up to the Harm Limit — 3 for most models, 4 with Power Armor or Burly. When Harm would exceed the limit, the extra becomes an Injury instead — mark one of the H circles on the card. When all circles are filled, the model is removed from the battlefield. Grunts have 1 circle — one Injury and they're done."
Step 8 — Perks and Weapon Traits
Point to the crew card: "Each model has Perks — special abilities listed on the sheet with a short description. Weapon traits like Aim, Fast, and Wind Up are also on the card. Read them before you activate — they change how attacks work."
For models with the Medic perk: "This model's Patch Up heals 3 Harm instead of 2, and can target a nearby friendly — not just themselves."
For models with the Power Armor perk: "This model can never gain Fatigue, and their Harm Limit is 4 instead of 3 — much harder to put down."
Step 9 — Let Them Play
Hand over the Initiative Token, point at the objective, and step back. Answer questions as they come up. The first round will be slow — by the third it usually flows on its own.
Not Covered in This Demo
The following rules exist but were deliberately skipped to keep the demo moving. Share this list with players who want to know the full picture before their first real game:
Gameplay mechanics not shown
- Confusion Tests — triggered when a model is Incapacitated; nearby friendlies may Flee or take Fatigue
- Hurrying — spend extra Fatigue to move 12" instead of 8" during Get Moving
- Passing strategically — you can Pass at any point in a round, not just when your models are gone
- Control Area — a radius extending C (Charisma) inches from a model's base; governs Supporting Fire, Orders, and many special rules
- Supporting Fire — before a ranged attack, designate up to C (Charisma) friendlies within Control Area; each takes Fatigue and adds 1 Bonus Die to the attacker's pool
- Orders — Get Moving can carry friendlies within Control Area along with the activating model
- Obscured / Blocked Shot — if the target is partially hidden by one of its own crew mates, the defending player can force the attack onto that crew mate instead
- Dropping down — a model can drop without a climbing feature, but if the height exceeds its Agility in inches, its move ends on landing
Content not in this crew set
- Rummage Action and Search Tokens — finding Caps and Chems on the battlefield
- Chems — consumable boosts you can use during the game
- Ploys — faction-specific tricks you spend tokens to activate
- Radiation — terrain hazard that degrades Endurance
Campaign rules (not relevant to a demo game)
- Story Phase, XP, levelling up models
- Crew building, Rating limits, Weapon Sets
- Facilities, Home Turf, Scouting Points
- Captives, post-game Recuperate Tests
- Objectives and scoring variants